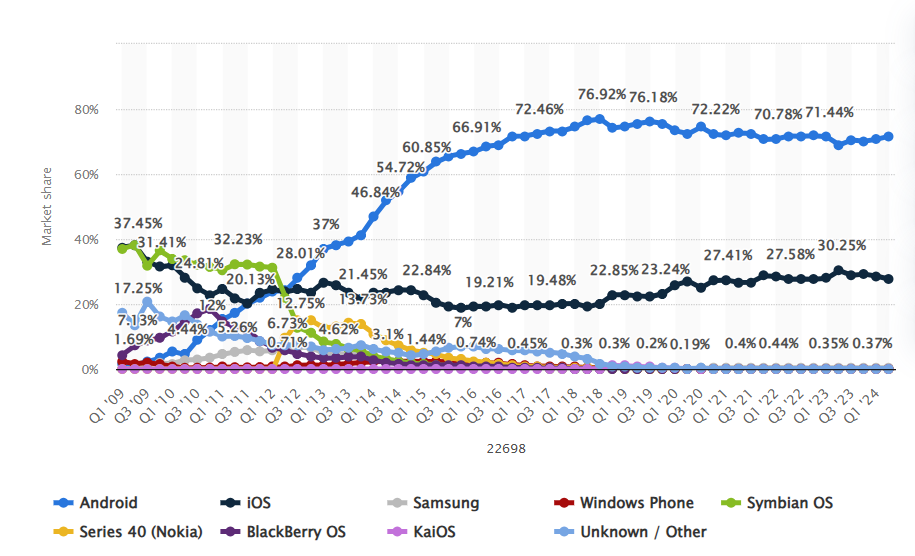
In recent years, the mobile device market has experienced exponential growth, revolutionizing the way people interact with technology. Currently, there are over 6.5 billion mobile devices in use worldwide, and the forecast is that this number will reach 7.7 billion by 2027. The chart below illustrates the global market share of mobile operating systems. According to the data, between 2009 and 2024, Android devices will represent 71.65%, more than double the iOS devices, which hold 27.62% of the market. Along with the growth of mobile operating systems, the mobile app market has also expanded significantly. In the Google Play Store, which distributes apps for Android, it is estimated that there are currently over 3.7 million available options, created by more than 1.15 million developers.
The vast number of mobile applications for Android on the market requires constant attention to security, as the proliferation of apps can increase users’ vulnerability to cyber threats. Many applications may contain vulnerabilities that compromise personal data, such as passwords and financial information, in addition to exposing devices to security risks. These vulnerabilities can be exploited by attackers, making it essential for developers to adopt stringent security practices when creating and updating their applications.
Android applications are commonly developed in Java and Kotlin. The Java language, known for its security and portability, was designed with a careful approach to secure coding. However, Android applications may also include components developed in native languages such as C, C++, and Assembly, which, while offering better performance, pose higher security risks. Although there is a vast amount of research focused on the Java portion of Android applications, whether through static or dynamic analysis, there is a notable gap when it comes to considering the natively developed components. These components, being less monitored and often less secure, may have critical vulnerabilities that can be exploited.
In this context, fuzzing emerges as a powerful technique for testing and identifying vulnerabilities in software. By applying fuzzing to native Android components, as explored in this document, professionals can prevent critical failures that could compromise millions of devices worldwide. The combination of tools such as AFL++ and QEMU allows for controlled and effective testing of vulnerability scenarios in Android applications, promoting increasingly robust security that is better prepared to face modern cyber threats.
This article marks the beginning of a series on fuzzing native code in Android applications. In this first article, we will cover the fundamental concepts of fuzzing, the role of native components in Android applications, the use of the AFL++ fuzzer, and finally, we will create a harness to perform fuzzing on an example library.
GETTING STARTED WITH FUZZING
Fuzzing is a software testing technique that involves injecting malformed or unpredictable inputs in order to detect vulnerabilities and security issues. These inputs are generated and sent to the software being tested through a tool called a fuzzer. Different input generation strategies can categorize fuzzers into:
- Black-box fuzzers: These do not require access to the application’s source code, focusing only on its input, through the generation of random inputs, and its output, operating without understanding the internal details of the program.
- Grey-box fuzzers: These can operate with either partial access to the source code or limited knowledge of the program, integrating aspects of both black-box and white-box fuzzers.
- White-box fuzzers: These depend on access to the source code or internal information of the program, allowing for the generation of inputs that explore the code in a targeted and structured manner.
Additionally, these inputs can be generated in two main ways: through Mutation-Based Fuzzing and Generation-Based Fuzzing:
- Mutation-Based Fuzzing: Inputs are generated by modifying existing valid inputs, exploring small and gradual variations to test different execution paths of the program.
- Generation-Based Fuzzing: Inputs are completely newly generated based on a model or specification of the input format. For this, understanding the file format or protocol used by the application being tested is required.
As discussed earlier, the fuzzer is an essential tool for identifying vulnerabilities and bugs in applications by using varied and often unexpected inputs. Among its main characteristics and functions, the following stand out:
- Input Generation: The fuzzer creates or manipulates data inputs for the software under test, using a corpus as a base. The corpus is a set of test inputs that can include both valid and invalid examples, and serves as a starting point for generating new inputs. The inputs can be created randomly, based on a specific model, or by modifying existing ones, depending on the strategy adopted by the fuzzer.
- Software Execution: The fuzzer feeds the inputs into the software to observe how it responds to different types of data. This can be done in two ways: directly, by executing specific functions or sending data through network protocols, or indirectly, by using a harness. The harness is responsible for creating a valid environment for the execution of the target function, reading the inputs provided by the fuzzing mechanism, and directing the execution to the target function with these inputs as parameters. As we will see later, since native components in Android applications are generated through dynamic libraries, it is the harness’s role to load these libraries and direct the fuzzer’s inputs to the function being tested.
- Code Coverage: The fuzzer measures code coverage to assess which parts of the program are executed during testing. Bitmaps are frequently used to represent this coverage, providing a clear visualization of the areas that have been analyzed. The goal is to maximize coverage to explore as many paths and conditions of the software as possible, helping to uncover faults in areas that may not be tested with more common inputs.
- Fault Detection: Through instrumentation or event monitoring techniques, the fuzzer observes the software’s behavior to detect faults such as crashes, unhandled exceptions, or unexpected behaviors.
- Result Reporting: When a fault is found, the fuzzer generates reports that include information about the input that caused the issue and the type of failure detected. This helps developers identify and fix vulnerabilities or bugs.
The interactions between these components can be seen in the figure below.

For our tests, we will use the AFL++ fuzzer along with QEMU. As we will see, AFL++ is a fuzzing tool that automates input generation to test the security of programs, identifying flaws and vulnerabilities. QEMU is a hardware emulator and virtual machine that allows you to run operating systems and applications in a virtualized environment, simulating different hardware architectures and configurations. Combining QEMU with AFL++ enables fuzzing in a virtualized environment, offering the flexibility to simulate various configurations and architectures without the need for physical hardware. This is especially important for testing mobile device applications, which use processor architectures and requirements distinct from those commonly found in PCs, allowing fuzzing to be conducted on platforms that accurately replicate the real conditions of the target devices.
The advantage of using QEMU for fuzzing instead of a real Android device lies in the simulation and control capabilities it offers. QEMU allows creating a virtualized environment where we can test the application on a simulated system, with the flexibility to modify the system’s configuration and state without the need for physical hardware. This makes it easier to run tests in different configurations and scenarios without the risk of damaging real devices, as well as enabling detailed instrumentation and real-time analysis. Additionally, using QEMU allows for easy scalability of tests, running multiple tests simultaneously in different virtual instances, which increases the efficiency and breadth of the security analysis.
ANDROID APPLICATION NATIVE COMPONENTS
An application written in Java or Kotlin for Android is executed by the Android Runtime (ART). The Android Runtime is an execution environment that uses Just-In-Time (JIT) compilation to convert Android app bytecode into native code during runtime, optimizing performance by pre-compiling frequently used methods. Although the Android Runtime offers significant optimizations with Just-In-Time compilation for Android app bytecode, there are situations where computationally intensive operations are required, such as signal processing, cryptographic operations, network operations, and physics simulations found in game engines like Unity and Unreal Engine. In these cases, the Android Runtime may not provide the necessary performance. Fortunately, it is possible to integrate components that execute native code directly into the application, which can result in substantial performance improvements. This capability is made possible by the Android NDK (Native Development Kit).
The Android NDK is a set of tools that allows developers to implement parts of the application code in native code, using languages such as C or C++. These parts can be connected with code written in Java or Kotlin through the use of JNI (Java Native Interface). The native code is compiled into dynamic libraries (*.so) and stored in the lib directory within the Android application package, where it can be loaded dynamically during execution as needed.
As mentioned earlier, JNI allows integration of Java application components to connect with components written in C or C++. On the Java side, the class that will use the JNI interface loads the dynamic library through the System.LoadLibrary() method in its static class initializer, passing the library’s name as a parameter, without the ‘lib’ prefix and file extension. References to methods implemented natively within the class have the native keyword before their declaration.
package com.conviso.example.jni;

public class HelloJni {
     static {
           System.loadLibrary(“hello-jni”);
     }

     public native String stringFromJNI();
     …
}
On the native component side, the interaction with Java components happens through JNI function calls. Typically, native methods have the following signature format, with all these fields separated by the underscore (_) symbol:
- The Java prefix;
- The package name;
- The class name;
- The method name, as defined in the Java class.
It is important to note that all native methods always have the JNI environment pointer and the Java object to which the method is attached as the first two parameters, respectively, JNIEnv * and object.
JNIEXPORT jstring JNICALL
Java_com_conviso_example_jni_HelloJni_stringFromJNI(
     JNIEnv* env,
     jobject thiz
)
{
        return (*env)->NewStringUTF(env, "Hello from JNI!");
}
The core of JNI is contained in the libnativehelper.so library. In order for native code to access the functions and definitions of JNI, it is necessary to include the jni.h header. The figure below shows the interaction between Java and C/C++ components through JNI, implemented in libnativehelper.so.

To apply the fuzzing process to the mentioned dynamic libraries, the Android NDK will be used to develop the harness, in conjunction with AFL++, which will be detailed in the next section. The following are the steps for installing the Android NDK:
- Download the latest version of the Android NDK:
- Visit the Android NDK Downloads page and download the latest version of the Android NDK.
- Extract the android-ndk-<version>-linux.zip file to an appropriate directory.
- Configure the PATH environment variable:
- To make the Android NDK accessible from anywhere on the system, add the path to the directory <Android NDK path>/android-ndk-r27/toolchains/llvm/prebuilt/linux-x86_64/bin to the PATH environment variable. This can be done by editing your profile configuration file, such as .bashrc or .profile.
- Be sure to replace <Android NDK path> with the actual path where the Android NDK was extracted.
You can verify the successful completion of all steps by running the Android NDK’s CLANG.

When compiling a source code file with the aarch64-linux-android35-clang compiler, an executable file is generated for the ARM64 architecture. The command for compilation can be seen below:
$ aarch64-linux-android35-clang helloworld.c -o helloworld
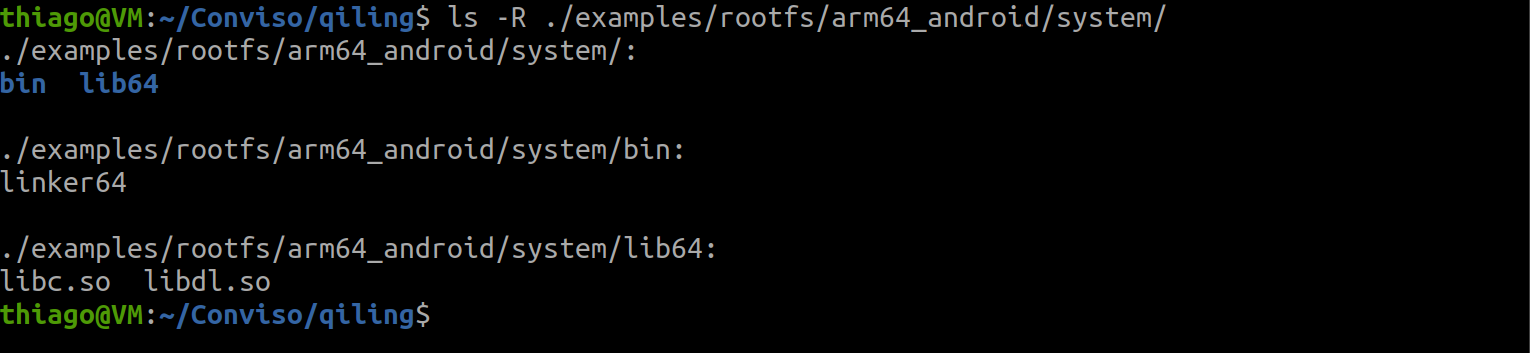
We can confirm that the generated binary is a 64-bit ELF file for the ARM64 architecture using the readelf command. After executing it, we identified that the binary depends on two dynamic libraries: libdl.so and libc.so, as well as the dynamic linker linker64. These dependencies are essential for the execution of the compiled file and can be obtained through the Qiling Framework.

The Qiling Framework is an open-source binary emulation and instrumentation framework, developed on top of Unicorn, a CPU emulator that is limited to emulating raw instructions without the context of the operating system. While Unicorn handles low-level emulation, the Qiling Framework is responsible for high-level tasks, including support for different executable file formats, dynamic linkers, and system call and input/output handlers. This allows Qiling to execute binaries that typically require a native operating system. Since the Qiling Framework supports ARM64 Android binary files, we can find these dynamic libraries within the project structure. The steps for downloading the project are described below.
$ git clone https://github.com/qilingframework/qiling
$ cd qiling
$ git submodule update --init --recursive
After downloading the Qiling Framework, we can verify the presence of the necessary files for running our application in the directory examples/rootfs/arm64_android/system.
AFL++ (AMERICAN FUZZY LOP PLUS PLUS)
AFL++ is an advanced fuzzer derived from AFL, originally created by Michael Zalewski for code coverage analysis and vulnerability research while at Google. As an enhanced fork of AFL, AFL++ provides higher speed, a wider range of configuration options, more effective mutations, and improved code instrumentation. Additionally, it supports custom modules and other advanced features. An added advantage is its efficient management of crash dumps, making it easier to analyze and triage failures detected during fuzzing.
For more details about AFL++, refer to the official project documentation. Among the various code instrumentation options available, AFL++ includes support for modules like QEMU, Unicorn, and Frida, which are significantly useful for fuzzing native Android components. Below are the steps for compiling AFL++:
$ git clone https://github.com/AFLplusplus/AFLplusplus
$ cd AFLplusplus
$ make distrib
After compiling AFL++ and enabling QEMU support for the ARM64 architecture, you will be ready to start testing with AFL++. During the fuzzing process, it is necessary to instruct AFL++ to force QEMU to ignore the signal handlers registered for the target application. Otherwise, AFL++ will not be able to detect when the application crashes. To do this, you can enable the AFL_QEMU_FORCE_DFL flag (by setting AFL_QEMU_FORCE_DFL=1) before running afl-fuzz, or apply a patch to permanently disable the registered signal handlers. In this article, we chose to apply the patch to ensure that the signal handlers are permanently disabled.
The tip on using the AFL_QEMU_FORCE_DFL flag was provided by Andrea Fioraldi, to whom we are grateful for his valuable contribution.
If you choose to apply the patch, you will need to modify the two files below, the procedures for which are detailed below. It is important to note that if you need to debug the target application, the line calling signal_init() must be uncommented. Otherwise, the debugger will not be able to receive the signals emitted during the application’s execution.
- AFLplusplus/qemu_mode/qemuafl/linux-user/main.c: comment out the call to the signal_init() function. The signal_init() function in QEMU sets up signal handling for user applications, including fatal signals, and defines basic handlers for them. Signal emulation is important to ensure that QEMU simulates and responds correctly to events and interrupts as if the application were running on the operating system of the emulated architecture. The signal emulation and management done by QEMU prevent AFL++ from receiving fatal signals from the harness, making it more difficult to identify crashes for certain inputs.

- AFLplusplus/qemu_mode/build_qemu_support.sh: comment out all the git commands in the QEMU build script. The script runs commands that may overwrite local modifications, so to ensure that your changes in main.c are not lost, it is essential to comment out these commands before running the script.

After making the changes to these files, we can proceed with compiling the QEMU support using the commands below:
$ sudo apt install ninja-build
$ cd qemu_mode
$ CPU_TARGET=aarch64 ./build_qemu_support.sh
We can test the AFL++ installation by running the command afl-fuzz. The output of the command is described below.

CREATING A HARNESS AND PERFORMING FUZZING WITH AFL++
With AFL++ properly compiled and running, we can proceed with creating the harness and starting the fuzzing process. For our tests, we will assume that we have access to the dynamic library of an Android application, and the C code is presented below. We opted for this approach to simplify the process and avoid the complexity of reverse-engineering ARM64 code, which could be addressed in a future article. In a real scenario, it would be necessary to identify an appropriate target function in the dynamic library and perform code analysis using disassembly tools like IDA Pro, Ghidra, radare2, or Hopper. The strcpy function copies a source string to a destination, but it can cause memory corruption if the destination does not have enough space to store the source string, leading to memory overlaps and potential security vulnerabilities.
#include <stdio.h>
#include <string.h>

int checkBuffer(const char *data)
{
        char localBuffer[256];
        if (data[0] == 'c') {
                if (data[1] == 'o') {
                        if (data[2] == 'n') {
                                if (data[3] == 'v') {
                                        strcpy(localBuffer, data);
                                        return 0;
                                }
                        }
                }
        }
        return 1;
}
Representation of the checkBuffer code in C, contained in the library libfuzzconviso.so.
If the reader wishes to replicate the experiment in this article and does not have a target library, it is possible to generate the dynamic library libfuzzconviso.so, which we will use as a demonstration in this article, using the command below.
$ aarch64-linux-android35-clang libfuzzconviso.c -o libfuzzconviso.so -shared -fPIC
After obtaining and analyzing the dynamic library, we will create a harness that will load the dynamic library and pass the mutated inputs generated by AFL++ as arguments to the target function. In our experiment, the checkBuffer function. AFL++ will monitor the behavior of the harness to identify potential failures or crashes in the application. Below is the code for the developed harness. The harness will obtain the file path generated by AFL++, read its content into a buffer, and pass it to the target function.
#include <stdio.h>

extern int checkBuffer(char *);

int main(int argc, char *argv[])
{
        char buffer[4096];
        FILE *fp = fopen(argv[1], "r");
        fread(buffer, 4096, 1, fp);
        checkBuffer(buffer);
        fclose(fp);
        return 0;
}
harness.c
We can compile the harness using the command below. This also links the harness with the dynamic library libfuzzconviso.so, which should be located in the current directory.
$ aarch64-linux-android35-clang harness.c -o harness -lfuzzconviso -L .
With the dynamic library of the application and the harness in hand, we need to configure two environment variables:
- QEMU_LD_PREFIX: Configures the location where QEMU looks for shared libraries for the emulated architecture. This variable must be set to the path to the /system directory of Android, included in the Qiling Framework, allowing the execution of binaries compiled for Android in QEMU. The /system directory in Android contains essential operating system files, including binaries, libraries, and system applications.
- QEMU_SET_ENV: Configures the environment variables for the process to be emulated by QEMU. In the context of fuzzing with AFL++ and QEMU, we will specify the LD_LIBRARY_PATH environment variable, which defines the path to additional dynamic libraries used by your harness, such as the directory containing libfuzzconviso.so.
$ export QEMU_LD_PREFIX="/home/thiago/Conviso/qiling/examples/rootfs/arm64_android/"
$ export QEMU_SET_ENV=LD_LIBRARY_PATH="/home/thiago/Conviso/workspace/"
After compiling the harness and configuring the necessary environment variables for running QEMU with AFL++, we will create a directory to store the corpus used in fuzzing. In a real scenario, the corpus is usually selected based on the type of target to be fuzzed, to maximize coverage and fuzzing efficiency. However, for the checkBuffer example, a simple text file is sufficient. Initially, the directory will contain only one text file representing the content of the buffer to be passed to the checkBuffer function. This file will be modified by AFL++ and used as input for the target function in the dynamic library of the Android application through the harness.
$ mkdir afl_in
$ echo "AAAA" > afl_in/input.txt
With the corpus properly prepared, we can begin the fuzzing process using afl-fuzz with the command below.
$ AFL_INST_LIBS=1 afl-fuzz -Q -i afl_in/ -o afl_out/ -- ./harness @@
Before running afl-fuzz, let’s break down the options passed to afl-fuzz to understand what each part does:
- AFL_INST_LIBS=1: This environment variable configures AFL++ to instrument code contained in dynamic libraries. Since our goal is to instrument libfuzzconviso.so, we need to set this environment variable.
- -Q: This option tells AFL++ to use QEMU’s instrumentation mode to monitor and analyze the behavior of the target application during execution.
- -i afl_in/: Specifies the input directory where the corpus files that AFL++ will use for the fuzzing process are located.
- -o afl_out/: Defines the directory where AFL++ will store the fuzzing results, such as test cases that caused crashes and execution logs.
- —: The — is a separator that marks the end of AFL-fuzz options and the beginning of the target application command line to be executed, in this case, the harness.
- ./harness: Specifies the path to the application to be executed during the fuzzing process.
- @@: This is a placeholder used by AFL++ that will be replaced with the path to the input file generated by the fuzzer during execution.
When running AFL++ for the first time, you may encounter the following error. The message indicates that, due to the system configuration for sending core dump notifications to an external service, AFL++ may mistakenly interpret crashes as timeouts due to the way the waitpid() function operates. To fix this issue, run the suggested command: echo core > /proc/sys/kernel/core_pattern.

After a period of AFL++ execution, you will start to observe that crashes are recorded in the ‘total crashes’ field of the AFL++ interface. The presence of these crashes indicates that AFL++ has found failure conditions in the tested application, which can be analyzed to identify vulnerabilities or undesirable behaviors in the code.

The inputs that cause crashes in the application are stored in the directory ./afl_out/default/crashes. This directory contains examples of input data that led to failures during the fuzzing process. In the image below, we see an example of one of these inputs. It is important to note that the input in question begins with the string ‘conv’. This indicates that the fuzzer was able to satisfy all the necessary checks and conditions to reach the potentially unsafe section of our library — in this case, the strcpy function. This ability of the fuzzer to explore different execution paths was made possible by code coverage, which allows the fuzzer to exercise various parts of the program. The more execution paths the fuzzer can test, the higher the likelihood of discovering vulnerabilities and hidden issues.

To test an input generated by AFL++ and check the application’s response, we use afl-qemu-trace to execute it with a specific input. afl-qemu-trace instruments the application’s execution, allowing us to monitor if the input causes any error or failure. In the case below, we can confirm that the input caused a segmentation fault in the application.

CONCLUSION
The increasing diversity of mobile applications for Android emphasizes the urgent need to prioritize security in an environment that is becoming more susceptible to cyber threats. Although languages such as Java and Kotlin provide a solid foundation in terms of security, the inclusion of native components in C, C++, and Assembly introduces additional risks that cannot be ignored. In this context, the use of fuzzing with tools like AFL++ and QEMU stands out as an effective approach to identifying and mitigating common vulnerabilities in low-level code, which are often difficult to detect.
In the next article, we will explore a real-world scenario, where we will identify the native components of the application, create and discuss strategies for developing harnesses, and analyze how vulnerabilities manifest in an Android application.
REFERENCES
https://www.iprog.it/blog/sicurezza-informatica/mobile-security-harnessing-afl-for-fuzz-testing/
https://asrp.darkwolf.io/ASRP-Plays/fuzz
https://aflplus.plus/building/
https://www.statista.com/statistics/272698/global-market-share-held-by-mobile-operating-systems-since-2009/
https://www.mobiloud.com/blog/mobile-app-statistics
https://www.sidechannel.blog/en/afl-and-an-introduction-to-feedback-based-fuzzing/
https://developer.android.com/ndk/samples
https://docs.oracle.com/javase/8/docs/technotes/guides/jni/spec/jniTOC.html
Good job! Well written comprehensive post.